Particle Systems
Particle systems are fun visual candy to add to your apps. They are often used to create smoke, explosions, and fire effects in games.
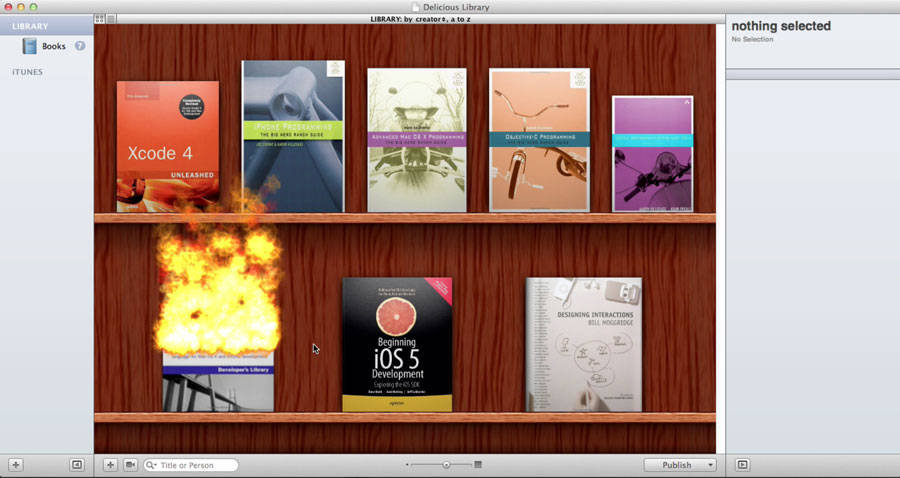
They make great touches in productivity apps as well. Delicious Library, for example, famously consumes a book with a fire animation when you remove a book from your virtual bookshelf. Apple’s animated “puff of smoke” image sequence – used to remove an application from the OS X dock – could be reimplemented more realistically as a particle system. You can also simulate a snow globe or confetti or … you-name-it. If many animated copies of a single particle / image can be used to create an effect, you can create the effect using a particle system.
Introducing CAEmitterLayer and CAEmitterCell
In iOS and OS X there is no need to deal with the complexities of OpenGL to create particle system effects; Apple has done the difficult work of creating an efficient implementation in Core Animation. Creating a particle system is easy using CAEmitterLayer and CAEmitterCell. The CAEmitterLayer class is a subclass of CALayer. It is the layer that hosts, or emits, the particles of the particle system. It defines several properties that describe the particle system overall, such as the scale, velocity, birthrate, lifetime, etc. of the particles within.
The CAEmitterCell class represents the particles themselves. Despite its CA-derived name, it is neither a subclass of CALayer nor a subclass of CAAnimation. Rather, it is used to describe the particles themselves. Those properties include image contents (a CGImageRef), a descriptive name, a scale, spin, lifetime, and others. Many of the properties also include a corresponding range. For example, the scale property has a corresponding scaleRange property. If you were to set the scale property to 2.0 and the scaleRange property to 1.0, the size of the particles would range from 1.0 to 3.0 times the size of the CGImageRef. This allows the particle system to randomize its properties to create natural-looking particle effects like smoke or fireworks. See CAEmitterCell.h or the CAEmitterCell Class Reference for more details on these properties.
Demo Project “EmissionsTest”
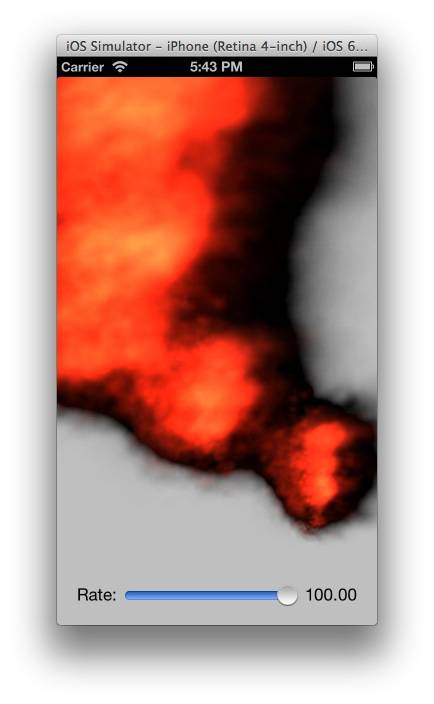
In this tutorial you will create an application that spews fire using a particle system. The user will be able to tap on the screen to animate the source of the fire and the slider at the bottom of the screen will control how much fire is emitted.
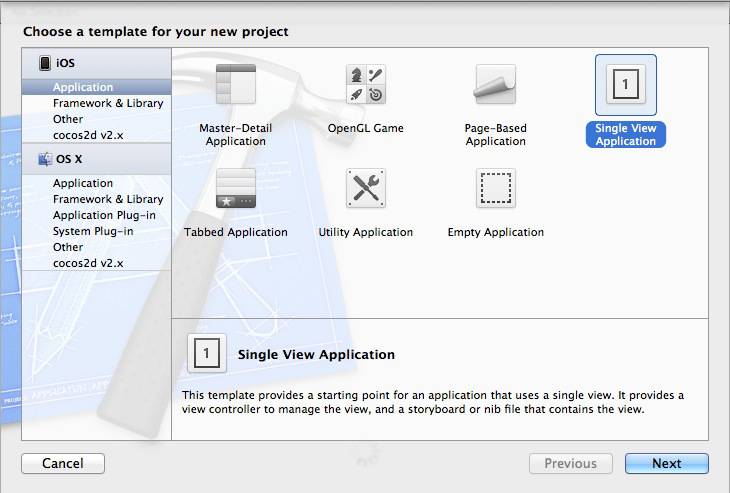
Open Xcode and create a Single View Application.
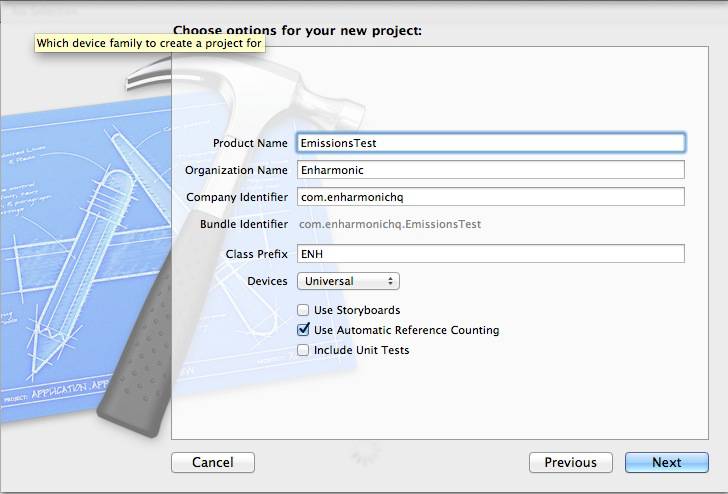
Call it EmissionsTest, use a class Prefix of “ENH”, make it Universal, and Use Automatic Reference Counting.
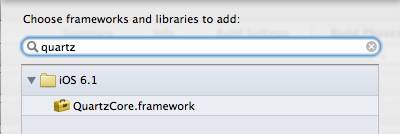
Add the QuartzCore Framework to the project.
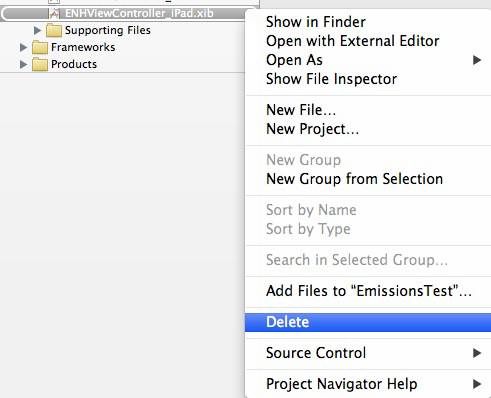
The user interface for this application will be very simple. It is easier to use the same view controller on the iPhone and the iPad in this case than it is to edit two separate xib files. Delete the ENHViewController_iPad.xib file and rename the ENHViewController_iPhone.xib file to ENHViewController.xib.
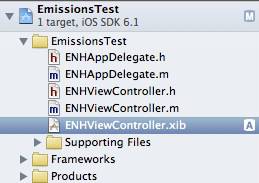
Now remove the following code from ENHAppDelegate.m.
// Override point for customization after application launch.
if ([[UIDevice currentDevice] userInterfaceIdiom] == UIUserInterfaceIdiomPhone) {
    self.viewController = [[ENHViewController alloc] initWithNibName:@"ENHViewController_iPhone" bundle:nil];
} else {
    self.viewController = [[ENHViewController alloc] initWithNibName:@"ENHViewController_iPad" bundle:nil];
}
Add this code in its place to load the single ENHViewController.xib at launch.
self.viewController = [[ENHViewController alloc] initWithNibName:@"ENHViewController" bundle:nil];
Now you will create some UI in ENHViewController.xib
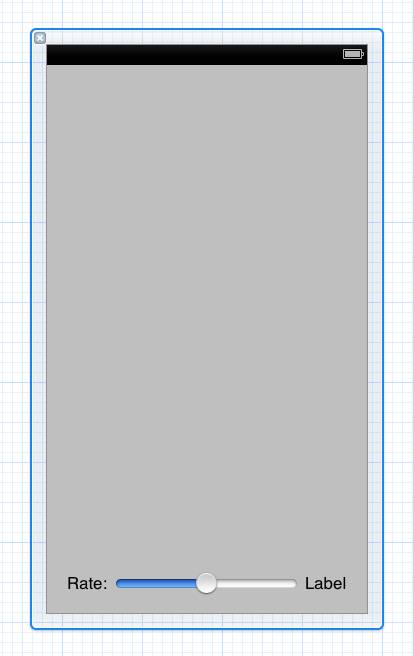
Drag a label to the lower-left of the view. Use the guides so that Interface Builder places it a default distance from the left and bottom edges of the view. Change the text on the label to read “Rate:”. Now add a slider. Place it a default distance from the “Rate:” label. Now add another label and place it a default distance from the slider.
The constraints with the slider selected should look like the image below.
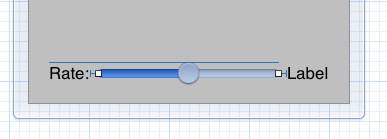
Now open the assistant editor to ENHViewController.m add an import for QuartzCore and create IBOutlets for the slider and the label on the lower-right. While you are there also add properties for a CAEmitterLayer called emitter and an NSString called imageName. You will need these later. The top of ENHViewController.m should now look like this:
#import "ENHViewController.h"
#import <QuartzCore/QuartzCore.h>

@interface ENHViewController ()

@property (nonatomic, weak) IBOutlet UISlider *slider;
@property (nonatomic, weak) IBOutlet UILabel *Label;
@property (nonatomic, weak) CAEmitterLayer *emitter;
@property (nonatomic, copy) NSString *imageName;

@end
To create the effect you will use a small .png image and use that image as the base shape for the particles. The particle system will draw many copies of this image on the layer and vary the tint of each particle to simulate fire.
For this project you will use the smoke15.png which you can download from: smokesprites.zip. Special thanks to GuShH’s Game Sprites for the images used for this demonstration.
Add the images to the EmissionsTest project and allow Xcode to copy the files into the project directory. In this tutorial you will use the smoke15.png image, but feel free to experiment with the other images later on.
Set up the CAEmitterCell
Now you will add code to setup the CAEmitterCell that will represent particles within the particle system. In ENHViewController.m add the following code to the viewDidLoad method.
- (void)viewDidLoad
{
    [super viewDidLoad];
    CALayer *myLayer = [self.view layer];
    NSUInteger smokeNumber = 15;
    NSString *imageName = [NSString stringWithFormat:@"smoke%d", smokeNumber];
    [self setImageName:imageName];
    UIImage *image = [UIImage imageNamed:imageName];
    assert(image);
    CAEmitterCell *cell = [CAEmitterCell emitterCell];
    [cell setName:imageName];
    float defaultBirthRate = 30.0f;
    [cell setBirthRate:defaultBirthRate];
    [cell setVelocity:120];
    [cell setVelocityRange:40];
    [cell setYAcceleration:-45.0f];
    [cell setEmissionLongitude:-M_PI_2];
    [cell setEmissionRange:M_PI_4];
    [cell setScale:1.0f];
    [cell setScaleSpeed:2.0f];
    [cell setScaleRange:2.0f];
    [cell setContents:(id)image.CGImage];
    [cell setColor:[UIColor colorWithRed:1.0
                                   green:0.2
                                    blue:0.1
                                   alpha:0.5].CGColor];
    [cell setLifetime:3.0f];
    [cell setLifetimeRange:2.0f];
}
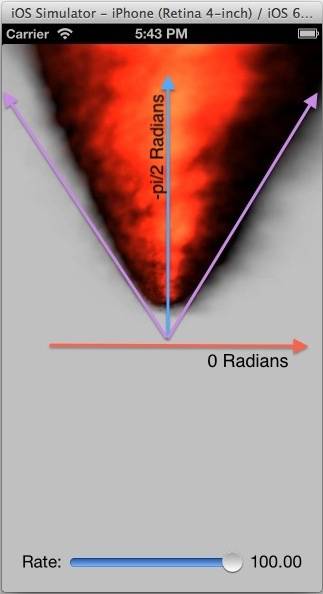
This code sets the values of some properties on the CAEmitterCell object that affect the visualization. Notice that you instantiated only one CAEmitterCell. The CAEmitterLayer will use the properties of that single cell to generate multiple copies of the smoke image with randomized scale, direction, and velocity per the properties you have set in the code above. The EmissionLongitude property is set in radians. 0 radians points to the right, so to get the smoke to go upward, we need to rotate the emissions -pi/2 or 90 degrees counterclockwise. The emissionRange property is set to pi/4. This causes the smoke to emit in a vertical cone 45 degrees wide.
Set up the CAEmitterLayer
Now you will add a CAEmitterLayer to host the particles. The layer fills the entire view. This allows you to change the emitter position within the layer later on rather than moving the layer itself. For now, you will set the emitter position to the center of the layer. Add the following code to the viewDidLoad below the code you just added.
… //below the code you added above
CAEmitterLayer *emitter = [CAEmitterLayer layer];
[self setEmitter:emitter];
[emitter setEmitterCells:@[cell]];
CGRect bounds = [self.view bounds];
[emitter setFrame:bounds];
CGPoint emitterPosition = (CGPoint) {bounds.size.width*0.5f,bounds.size.height*0.5f};
[emitter setEmitterPosition:emitterPosition];
[emitter setEmitterSize:(CGSize){10.0f, 10.0f}];
[emitter setEmitterShape:kCAEmitterLayerRectangle];
[emitter setRenderMode:kCAEmitterLayerAdditive];
[myLayer addSublayer:emitter];
[self setEmitter:emitter];
Build and run your app. You should see fire!
Note:The slider shouldn’t change the particle system just yet.
Setting-up the UISlider to change birthrate
Now you will make the UISlider change the birthrate of the particles. The birthrate is how often a new cell is drawn in the particle system.
Add the following code to the bottom of viewDidLoad below the code you just added.
float birthRateMin = 1.0f;
float birthRateMax = 100.0f;
[self.slider setMinimumValue:birthRateMin];
[self.slider setMaximumValue:birthRateMax];
[self.slider setValue:defaultBirthRate animated:NO];
[self.label setText:[NSString stringWithFormat:@"%4.2f", defaultBirthRate]];
...
}
Now implement the slider’s action and wire it up to the slider interface builder.
- (IBAction)sliderChanged:(id)sender
{
    NSLog(@"%@ %@", NSStringFromSelector(_cmd), sender);
    float value = [(UISlider *)sender value];
    [self.label setText:[NSString stringWithFormat:@"%4.2f", value]];
    NSString *keyPath = [NSString stringWithFormat:@"emitterCells.%@.birthRate", self.imageName];
    [self.emitter setValue:@(value) forKeyPath:keyPath];
}
Notice that you are setting the value for a particular cell within the emitter layer by using a key path that accesses the emitter cell by name.
Build and run your app. You should see the fire change birthrate when you move the slider.
If the birthrate isn’t changing, make sure you have wired up the slider in interface builder to the
sliderChanged:method.
Moving the Fire With a Tap Gesture Recognizer
Now you will move the emitter position around the screen to follow the user’s tap. You will also animate change of position on screen over the course of one second.
Add the following code to the bottom of viewDidLoad to setup the tap gesture recognizer.
    UITapGestureRecognizer *gestureRecognizer = [[UITapGestureRecognizer alloc] initWithTarget:self
    action:@selector(recognize:)];
    [self.view addGestureRecognizer:gestureRecognizer];
}
Now implement the recognize: method.
-(void)recognize:(UITapGestureRecognizer *)sender
{
    CGPoint location = [sender locationInView:self.view];
    NSString *animationKey = @"position";
    CGFloat duration = 1.0f;
    CABasicAnimation *animation =
       [CABasicAnimation animationWithKeyPath:@"emitterPosition"];
    CAEmitterLayer *presentation =
           (CAEmitterLayer*)[self.emitter presentationLayer];
    CGPoint currentPosition = [presentation emitterPosition];
    [animation setFromValue:
               [NSValue valueWithCGPoint:currentPosition]];
    [animation setToValue:[NSValue valueWithCGPoint:location]];
    [animation setDuration:duration];
    [animation setFillMode:kCAFillModeForwards];
    [animation setRemovedOnCompletion:NO];
    [self.emitter addAnimation:animation forKey:animationKey];
}
You are animating the emitterPosition property of the emitter layer using CABasicAnimation, a subclass of CAAnimation. One confusing thing about Core Animation is that a CAAnimation does not directly modify the properties of the layer itself, rather you can think of it as a sort of dynamic filter that only makes the CALayer look like its properties are being animated over time. Since the animation keeps translating the layer after the animation stops moving, the actual emitter position on screen is not the same as the CAEmitterLayer‘s emitterPosition property. In order to animate the emitter position from its current visual location in the layer, you first need to get a pointer to the emitter’s presentationLayer property.
The presentation layer always represents a CALayer‘s final property values as they appear on screen, even if they are currently being modified by a CAAnimation applied to the layer. Leaving the animation applied to the layer keeps the emitter position “stuck” on screen wherever the animation completes, which is where the user last tapped. Each time the user taps, you replace the currently applied animation with a new animation. Since you are adding the animation using the unique key @”position”, the animation that was formerly applied with that key is replaced by the new animation on the fly. This trick makes it easy to move the fire when the user taps from wherever it is currently positioned visually, even if it is currently being moved around by a previously applied animation.
Build and run the app. Tapping on screen should cause the origin of the fire to move to the location of your tap.
Making it pretty on the iPad
If you run the app on an iPhone, it looks great. If you run it on the iPad and tap to move the fire near the bottom of the screen the smoke puffs disappear suddenly as each nears the top of the screen. This is because their lifetime property is set to three seconds plus-or-minus one second by this code in viewDidLoad:
[cell setLifetime:3.0f];
[cell setLifetimeRange:1.0f];
This duration is not quite long enough on the iPad for the smoke to animate off of the screen before it disappears, which is rather jarring visually.
Replace the code above in viewDidLoad with this code.
if ([[UIDevice currentDevice] userInterfaceIdiom] == UIUserInterfaceIdiomPad)
{
    [cell setLifetime:6.0f];
    [cell setLifetimeRange:2.0f];
}
else
{
    [cell setLifetime:3.0f];
    [cell setLifetimeRange:1.0f];
}
Build and run again on the iPad. Much Better.
Going Further
Core Animation’s CAEmitterLayer and CAEmitterCell make it easy and fun to add particle systems to your Mac OS X and iOS apps. Since Apple uses hardware accelerated OpenGL under the covers, these particle systems are very resource efficient. You can add lots and lots of particles and emitter layers to the screen before performance begins to suffer. You may have noticed that the particle systems are actually a lot slower on the simulator than they are on the device. We suspect that Apple may use a software renderer on the iOS simulator rather than OpenGL, so don’t worry too much if the simulator is sluggish. Always test on a device before optimizing CAEmitter code.
There are many properties of CAEmitterLayer and CAEmitterCell that you can tweak to make some really neat visualizations. You can also provide multiple CAEmitterCells to the CAEmitterLayer to add more particle types to the particle system. This would allow you to, for example, use one particle for fire and another for smoke.
You can also change the image that is used for the particle. Try experimenting with some of the other particles we have provided. The visualization will change significantly with different sizes and shapes of particles.
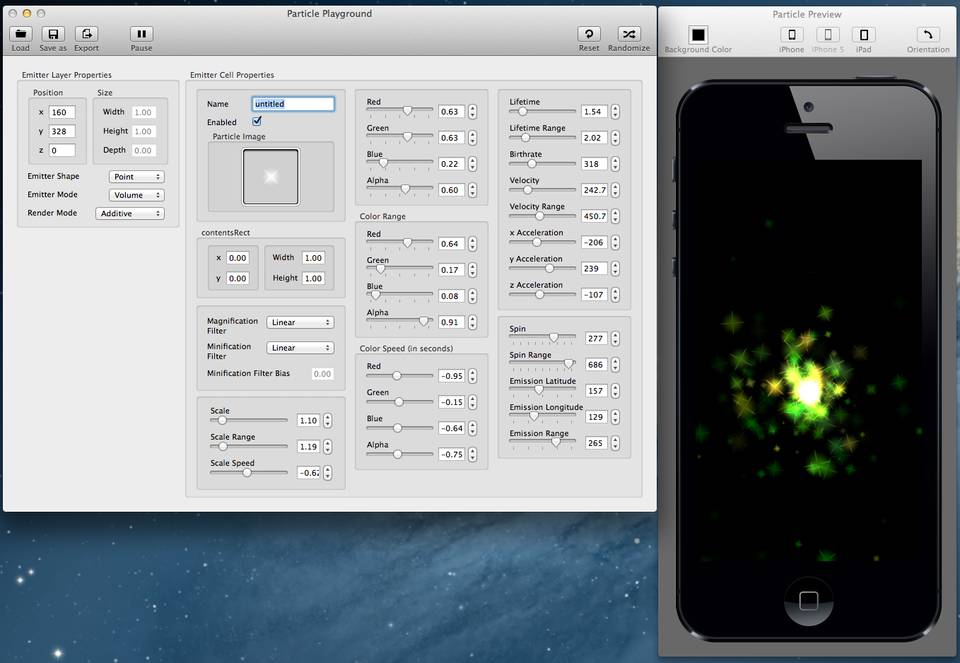
There is a very useful app on the Mac App Store called Particle Playground that you may want to check out. Particle Playground lets you play around with the properties of the Emitter Layer and its Emitter Cell. You can also add subcells to an Emitter Cell, making your particles have particle systems of their own. Apple’s sample code called Fireworks uses this technique to create beautiful fireworks visualizations. There is also a port of this sample to iOS available on github kindly provided by tapwork that is a lot of fun. Install it on your iPad and enjoy the show!
References
- CAEmitterCell Class Reference
- Particle Playground by Vigorous Coding
- Apple Fireworks Sample Code
- iOS-Particle-Fireworks
Thank You
Special thanks to Wil Shipley and the crew at Delicious Monster for permission to use the Delicious Library screenshot. Special thanks also goes to Kai Schwaiger of Vigorous Coding for permission to use the Particle Playground screenshot.